воскресенье, 28 февраля 2021 г.

thumbnail

Cheesy Lemon Angel Hair

This pasta is heavenly.


  1. Bring a large pot of water to a boil and generously season with salt. Cook pasta according to al dente package directions. Drain.
  2. In a large skillet over low heat add 2 tablespoons olive oil and 2 tablespoons butter. When butter starts to bubble add garlic and lemons. Season with salt and pepper and cook until lemons are softened, about 2-3 minutes. Whisk in flour and cook for 1 minute. Add chicken broth and whisk until smooth. Add cheeses while constantly whisking.
  3. Add cooked angel hair and toss in sauce with parsley. Serve immediately.

This content is created and maintained by a third party, and imported onto this page to help users provide their email addresses. You may be able to find more information about this and similar content at piano.io


пятница, 26 февраля 2021 г.

thumbnail

Cheesy Jiffy Corn Casserole


Looking for a side dish that’s sweet and savory all at the same time? We’re not talking about full-blown, dessert-level sweet, but just the perfect pops of sweetness here and there that add depth and greatness to the recipe. That’s this cheesy, jiffy corn sour cream casserole we’ve got for you today. One box of corn muffin (essentially, cornbread) mix is all you need to get started here – and not a big box, mind you; there’s so much yummy stuff going on in this dish, the cornbread mix adds substance and holds things together, but isn’t the star of the show. This is an ensemble-piece of a recipe where all the ingredients work together to make something amazing.


Along with the cornbread mix, we’ve got two cans of corn in there (one normal kernels, one cream-style), so it really is jam-packed with fresh flavors, then egg and plenty of cheddar cheese, plus, sour cream, which helps keep this from being dry. No one wants dry corn casserole, so the sour cream is crucial here, you’ll see. You mix together your cornbread mix, butter, corn(s), egg and half of the cheddar cheese (all of which can happen in the same casserole dish you’ll end up baking it in), then you drop your sour cream down in dollops and swirl it all together. The finished product is piping hot with sweet bites of corn and yummy pockets of sour cream. Oh man, we’re practically drooling just thinking about it.


Even though there’s cornbread mix in this, don’t expect it to cook or taste bready. It ends up being similar to a spoon bread, but the corn – particularly the creamed corn – keeps this a little on the thicker, denser side of things and makes it less likely to dry out. Thank the heavens, ‘cause it is delicious this way. At the end of the day, this is a dish that is suitable for any occasion and goes with just about any main course out there. Barbecue ribs? Uhh, yeah, this corn casserole is an awesome choice. Creamy chicken skillet? Sign us up for that with a side of this. You name it, this jiffy corn casserole will go swimmingly with it. Don’t believe us? Make it and see for yourself!


четверг, 25 февраля 2021 г.

thumbnail

Cheesy Garlic Bacon Scallops and Linguine

Cheesy Garlic Bacon Scallops and Linguine has pan seared golden brown sea scallops tossed together with a creamy Parmesan cheese sauce, tomatoes, garlic, and pasta.


a graphic of Cheesy Garlic Bacon Scallops and Linguine in a white serving dish
This recipe is easy and quick, ready in just 30 minutes.

Scroll to bottom for printable recipe card.


This seafood dish makes a great lunch, dinner, or impressive romantic date night meal for two.


This post contains affiliate links. At no additional cost to you, if you click through an affiliate link and make a purchase, I may make a small commission. This disclosure pertains to all Amazon links.


How to make it:


In a medium saucepan cook the pasta according to the package directions, then drain.


At the same time, dice the tomato.


Cut the bacon into 1” pieces. Cook and stir until crisp in a medium skillet. Leave the bacon grease in the skillet on medium heat. Drain the bacon on a paper towel lined plate.


bacon pieces cooking in a pan

Dry the scallops with paper towel and remove the side muscle.


a hand pulling the muscle off of a scallop with paper towel

Season the scallops with salt and pepper and then sear them in the bacon grease for 2 minutes per side. Drain on a paper towel lined plate and set aside.


scallops cooking in a pan

Add the olive oil and garlic to the frying pan. Stir and cook for 1 minute.


olive oil and garlic cooking in a pan

Pour the chicken stock into the frying pan and simmer on medium low heat for about 1 minute.


Add the heavy cream, stir to combine, and simmer for 2 minutes.


heavy cream added to sauce cooking in a pan

Sprinkle in the salt and pepper to taste and then add the bacon, tomatoes and the scallops to the sauce. Simmer for 2 minutes to warm the scallops.


bacon, tomatoes, and scallops added to sauce in a pan

Add the cooked pasta and Parmesan cheese. Gently toss to combine the pasta and sauce and serve.


a close up side view of Cheesy Garlic Bacon Scallops and Linguine in a white bowl

a close up side view of Cheesy Garlic Bacon Scallops and Linguine in a white bowl

thumbnail

Cheesy Enchilada Rice Skillet

The easiest enchilada you will ever make. No rolling, no folding. Just throw everything into a skillet and you’re set!


Cheesy Enchilada Rice Skillet - The easiest enchilada you will ever make. No rolling, no folding. Just throw everything into a skillet and you're set!

Cheese + red enchilada sauce + green enchilada sauce + rice. Now that’s my kind of dinner.


Now I’m not really sure what to really call this. I think of it as an inside-out enchilada. Or a glorified Mexican fried rice.


Either way, this beats any kind of rice I have ever had. And being Korean, I’ve had many rice dishes in my day.


Best of all, this skillet is completely customizable to what you have on hand – feel free to throw in more veggies or even grilled chicken for extra protein.


Quinoa would also be a wonderful healthy substitute for the rice, although I would personally end up having the double the servings instead!


Disclosure: This post is sponsored by Old El Paso. All opinions expressed are my own.


среда, 24 февраля 2021 г.

thumbnail

Cheesy Chicken Broccoli Pasta Shells

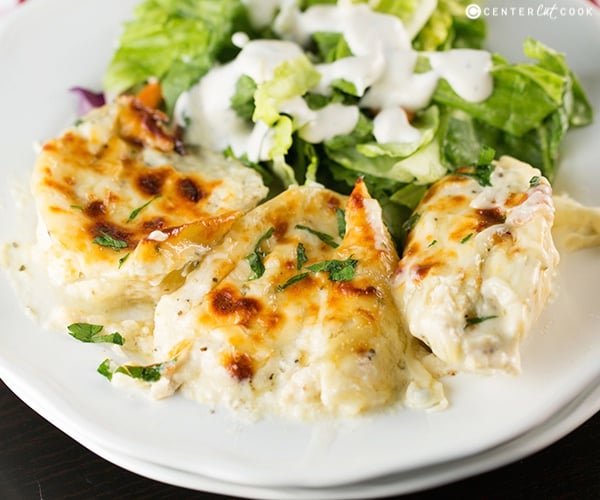
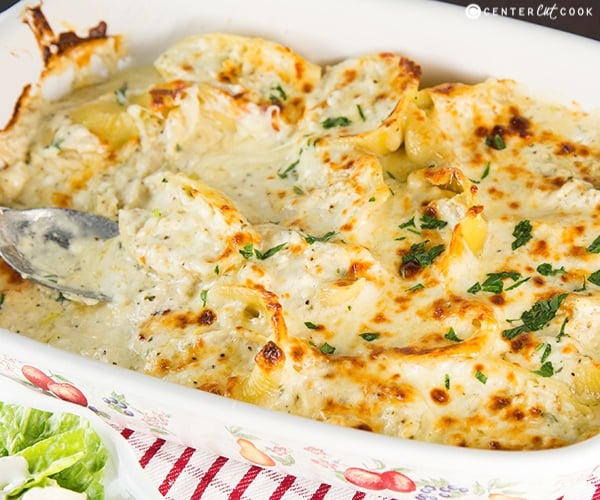
My cheesy Chicken Broccoli Pasta is a perfect recipe that the whole family will love. When you use shells pasta, it reminds you of your favorite childhood mac and cheese recipe. Adding the chicken and broccoli to this dish makes it an all-in-one meal that even the pickiest of eaters at your table will love.


CHICKEN BROCCOLI PASTA


There is nothing I love more than being able to make a meal that is easy to dish up in one bowl. Fewer dishes to wash, and easier for the kids to enjoy means a happier mom. Of course, kids love the idea of cheesy creamy macaroni and cheese, and using shell pasta has always been a fun way to dress up an otherwise simple recipe.


This is an update to my favorite creamy broccoli macaroni and cheese recipe. For this recipe, I decided to cook up simple chunks of chicken breast to mix into the pasta alongside the broccoli florets. I knew this was an easy way to get kids to eat vegetables, and the added protein makes it a whole meal in one bowl.


DO I HAVE TO USE SHELLS FOR THIS CHICKEN AND BROCCOLI PASTA?


You can use any pasta for this recipe. I do, however, prefer pasta that is a bit more textured or allows for the sauce to really stick to the noodles. Cheese sauce works well with shell pasta since it has tons of grooves and pockets to fill with the sauce. This is why I prefer it over other pasta.


Some good options to use would be penne, elbow macaroni, rigatoni, and fusilli. You can use whatever pasta you prefer. The real secret to this recipe is in the well-seasoned chicken and deliciously creamy cheese sauce.


CAN THIS PASTA RECIPE BE FROZEN?


One of my favorite things to do with an easy to make pasta dish is to prepare extra and freeze for later. On busy weeknights, it is nice to have extra healthy homemade meals in the freezer. I love cooking, but I know there are times when my schedule doesn't allow enough time to make a homemade meal for every meal. That's when extra servings of a favorite meal come in handy.


To freeze leftovers or extra servings of this pasta dish, I recommend putting individual servings into airtight freezer storage containers. I love using the Pyrex glass containers as they are perfectly portioned, and are great for reusing over and over again.


CAN I MAKE THIS A VEGETARIAN RECIPE?


If you are vegetarian but still want added protein in your pasta recipe, you can easily add in your favorite brand of fake chicken. There are many ready-made frozen "chicken" products available to choose from. You can also use fried tofu in this recipe or on the side as a way to add more protein without having actual meat in the recipe.


You do not have to add extra protein to this recipe to make it a full meal. It is delicious by itself. However, adding an extra protein like chicken or even tofu will help stretch the pasta further. As a result, this meal can feed more people, or provide more than one full meal for your family.


CAN I USE OTHER VEGETABLES FOR THIS CHICKEN BROCCOLI PASTA?


Of course, you can! There are so many vegetables that pair well with chicken and pasta. I love broccoli but also have made this with snow peas, bell peppers, green peas, and even cauliflower. When in season, I also love asparagus as a great option with tons of nutty flavor that pairs beautifully with this recipe.


The addition of vegetables is both for flavor and added fiber. If your family or children are picky eaters, pick their favorite veggie to mix into this recipe. You can even shred carrots or zucchini and mix them into this recipe to add texture and nutrients.


INGREDIENTS


  • Pasta
  • Broccoli
  • Chicken breasts
  • Butter
  • Flour
  • Milk
  • Chicken broth
  • Sharp cheddar cheese
  • Olive oil
  • Salt
  • Black pepper
  • Garlic powder
  • Onion powder

HOW TO MAKE CHICKEN BROCCOLI PASTA


To make this cheesy pasta with chicken and broccoli, you will begin by cooking the pasta according to package directions. Bring water to a boil, drop in your pasta and cook until al dente. You will drain the pasta and set it aside for later.


While the pasta is cooking, you will begin cooking the chicken breast chunks. You can mix together seasoning and roll the chicken in it, or simply sprinkle over all sides of the chicken. Then, you will cook in a skillet over medium heat until the chicken is done and browned on all sides.


In a saucepan, you will begin making a roux as the base of your cheese sauce. Mix in the cheeses and spices as directed, then stir into the cooked pasta.


Add in cooked pasta and the broccoli, and stir to combine. Finish by cooking for an additional 4-5 minutes before serving.


Top the pasta with additional shredded cheese, black pepper, or even a bit of grated Parmesan cheese if desired.


If you try this Cheesy Chicken and Broccoli Pasta recipe and like it, please use my hashtag to share it with me on INSTAGRAM for a chance to be featured in my story! Also, follow me at Cookin’ With Mima on FACEBOOK | INSTAGRAM | PINTEREST for all of my latest social posts and recipes.


MORE CHEESY PASTA RECIPES


I love a great mac and cheese recipe. Adding in the chicken and broccoli in this recipe is a perfect meal, but you may also want to serve a pasta dish as a side to your proteins. There are so many variations on a simple homemade macaroni and cheese recipe, and I have explored many of them. Below are some of my favorite recipes for you to bookmark and save for another day.


thumbnail

Cheesy Chicken Alfredo Stuffed Shells

Cheesy chicken alfredo stuffed shells

Cheesy Chicken Alfredo Stuffed Shells are made with jumbo pasta shells stuffed with cheese and chicken and topped with creamy alfredo sauce.


Stuffed Shells is a classic recipe that has been enjoyed around the family table for years. I decided to take the classic recipe for stuffed shells, the one that is very similar to lasagna, and turn it into a version that more closely resembles another classic, chicken alfredo made with my homemade Creamy Alfredo Sauce. The end result is cheesy, comforting and delicious, and promises to be a recipe that your family will ask you to make over and over again.


Cheesy chicken alfredo stuffed shells 3

One of the best aspects about this recipe is that you can make it your own by throwing in add-ins like spinach or even swapping out the chicken for something like sausage or leaving the meat out altogether for a vegetarian option.


Cheesy chicken alfredo stuffed shells 4

You can use any alfredo sauce that you like, but I’d recommend using my recipe for classic Creamy Alfredo Sauce. It is quick to make, and there’s something about homemade alfredo sauce that is so much better than any jarred alfredo sauce you’d buy at the grocery store.


Cheesy chicken alfredo stuffed shells 5

This recipe calls for pre-cooked shredded chicken. My favorite way to make shredded chicken is in the slow cooker. Here’s my recipe for Easy Slow Cooker Shredded Chicken. Another alternative to keep things quick and easy is to buy a rotisserie chicken from the grocery store and shred it up.


You will get about 20-25 stuffed shells from this recipe. These Cheesy Chicken Alfredo Stuffed Shells are so comforting and delicious, I have no doubt your family will love them. Enjoy!


Cheesy chicken alfredo stuffed shells 2

пятница, 19 февраля 2021 г.

thumbnail

Check Out the Cook Republic Kitchen and Home, Designed to Share

Kitchen renovations allow homeowners to customize their setups with open floorplans for entertaining, upgraded finishes in quirky color palettes, or even obscure built-in appliances to perfect favorite dishes. When lifestyle photographer and Cook Republic blogger Sneh Roy revamped her own Sydney kitchen, she did it with social media in mind. Everything created in the space is potential content for her site, so she considered the different nooks and styles she would need in order to bring variety to her work on the web. From crisp shots on white marble countertops, to dark and moody looks by the black chalkboard wall atop raw timber tables, to a light café feel with industrial furniture by the big glass doors, Roy’s idea was to create distinct zones in order to facilitate versatile looks for all of her popular food imagery.


The kitchen is an essential part of a real 3,700-square-foot 1960s brick-and-tile bungalow that feeds Roy’s loving family. Her husband Nick, an IT director, “is the caramel to my salted,” she says sweetly. Together, the pair enjoy having food adventures with their two boys Rivan (11 years old) and Rish (age 7), as well as caring for the many chickens and bunnies residing on the property.


The family appreciates the rarity of this moody, forest-like setting in their residential Sydney suburb. It was worth the seven years Roy spent coping with the home’s original kitchen, whose mustard cabinets had severe water damage, and warped countertops made it impossible for a chopping board to sit flat without rocking. During an eight-month renovation, the family camped out in the garage, boiled water in a kettle, and used the garden hose to do dishes in tubs through fall and winter. They missed sitting at a table and chairs to eat their meals. The resulting eclectic mix of old and new offers modern functionality — while keeping a mysterious feel — that ties into the rest of the house. It is the one adventure they are most glad to have completed. —Annie


Sneak Peek: Check Out the Cook Republic Kitchen Designed to Share, on Design*Sponge
1/29 The most photographed wall in the kitchen, this vintage luggage trolley laden with props makes Roy feel happiest about her home. When objects are switched out, it instantly changes the look and feel of the blackboard wall against which it is set.

Sneak Peek: Check Out the Cook Republic Kitchen Designed to Share, on Design*Sponge
2/29 Roy kept the island free of surface disturbances like a sink or cooktop to maximize prep and eating space. The timber ceiling beams are original to the house, and were painted white during the renovation.

Sneak Peek: Check Out the Cook Republic Kitchen Designed to Share, on Design*Sponge
3/29 Blogger Sneh Roy slices and dices in her renovated Sydney kitchen.

Sneak Peek: Check Out the Cook Republic Kitchen Designed to Share, on Design*Sponge
4/29 Sons Rivan and Rish make use of the space.

Sneak Peek: Check Out the Cook Republic Kitchen Designed to Share, on Design*Sponge
5/29 A shoot table, industrial light fittings, and a single large sink.

Sneak Peek: Check Out the Cook Republic Kitchen Designed to Share, on Design*Sponge
6/29 A stone windowsill houses potted herbs, sprouting jars, and pickling experiments. A vintage "The Earl"kitchen scale, chopping boards, and rolling pins overlook the pool.

Sneak Peek: Check Out the Cook Republic Kitchen Designed to Share, on Design*Sponge
7/29 The chalkboard wall in the distance, and Roy's yellow Kitchenaid "bee" stand mixer.

Sneak Peek: Check Out the Cook Republic Kitchen Designed to Share, on Design*Sponge
8/29 The fridge is tucked away under the only overhead cabinet in the kitchen for uninterrupted outdoor views.

Sneak Peek: Check Out the Cook Republic Kitchen Designed to Share, on Design*Sponge
9/29 A old ship funnel pendant light hangs over the wine fridge. Wide-planked reengineered oak floors are raised to define the living area.

Sneak Peek: Check Out the Cook Republic Kitchen Designed to Share, on Design*Sponge
10/29 Seasonal styling on the chalkboard wall.

Sneak Peek: Check Out the Cook Republic Kitchen Designed to Share, on Design*Sponge
11/29 A converted island holds the coffee machine, blender, juicer, and toaster. They are frequently-used items, but needed to live in a spot where they wouldn't crowd the counters.

Sneak Peek: Check Out the Cook Republic Kitchen Designed to Share, on Design*Sponge
12/29 Copper, green plants, and ceramics on the kitchen trolley with a view toward the outdoor dining area.

Sneak Peek: Check Out the Cook Republic Kitchen Designed to Share, on Design*Sponge
13/29 A recycled table is used for Roy's teaching workshops, set with elements from the home's bush terrain.

Sneak Peek: Check Out the Cook Republic Kitchen Designed to Share, on Design*Sponge
14/29 A former fireplace box set in the wall now functions as a little display window for whatever tickles Roy's fancy.

Sneak Peek: Check Out the Cook Republic Kitchen Designed to Share, on Design*Sponge
15/29 The dining area with a fast-growing Heartleaf Philodendron plant that quickly reached the ceiling and had to be relocated.

Sneak Peek: Check Out the Cook Republic Kitchen Designed to Share, on Design*Sponge
16/29 Porthole mirror detail in a bedroom.

Sneak Peek: Check Out the Cook Republic Kitchen Designed to Share, on Design*Sponge
17/29 A bedroom wall of windows invites the outdoors in.

Sneak Peek: Check Out the Cook Republic Kitchen Designed to Share, on Design*Sponge
18/29 The new veggie planters are doing well!

Sneak Peek: Check Out the Cook Republic Kitchen Designed to Share, on Design*Sponge
19/29 The kidney-shaped pool is nestled amongst lush greenery.

Sneak Peek: Check Out the Cook Republic Kitchen Designed to Share, on Design*Sponge
20/29 Ducks paying a visit.

Sneak Peek: Check Out the Cook Republic Kitchen Designed to Share, on Design*Sponge
21/29 Potted lemon trees.

Sneak Peek: Check Out the Cook Republic Kitchen Designed to Share, on Design*Sponge
22/29 Red Robin trees shed golden leaves in autumn.

Sneak Peek: Check Out the Cook Republic Kitchen Designed to Share, on Design*Sponge
23/29 Resident "chooks" include Luigi, Yoshi, Storm, Snowy, Baymax, and Professor Snape.

Sneak Peek: Check Out the Cook Republic Kitchen Designed to Share, on Design*Sponge
24/29 "Chooks" and their pen.

Sneak Peek: Check Out the Cook Republic Kitchen Designed to Share, on Design*Sponge
25/29 The chicken run in front of the "chookhouse."

Sneak Peek: Check Out the Cook Republic Kitchen Designed to Share, on Design*Sponge
26/29 The family's "granny chairs" sit in front of a fire pit.

Sneak Peek: Check Out the Cook Republic Kitchen Designed to Share, on Design*Sponge
27/29 The facade's rescued speckled “Convict Bricks” made from sandstone date back to the early days of the British Colony in Australia.

Sneak Peek: Check Out the Cook Republic Kitchen Designed to Share, on Design*Sponge
28/29 Sneh Roy, Rivan, Rish, and Nick.

Sneak Peek: Check Out the Cook Republic Kitchen Designed to Share, on Design*Sponge
29/29 A sketch of the kitchen renovation.

четверг, 18 февраля 2021 г.

thumbnail

CAULIFLOWER SOUP

Advertisements


Number of servings (yield): 4


Entire recipe makes 4 servings

Serving size is 1 1/2 cups

Each serving = 4 SP

PER SERVING: 123 calories; 3g fat; 1.5g saturated fat; 18g carbohydrates; 10g sugar; 9g protein; 4g fiber


Ingredients:


1 medium head cauliflower, broken into florets

1 medium carrot, shredded

1/4 cup chopped celery

2-1/2 cups water

2 teaspoons chicken or 1 vegetable bouillon cube

3 tablespoons butter

3 tablespoons all-purpose flour

3/4 teaspoon salt

1/8 teaspoon pepper

2 cups 2% milk

1 cup (4 ounces) shredded cheddar cheese

1/2 to 1 teaspoon of hot pepper sauce, optional


Advertisements


HOW TO MAKE:


1. In a large bowl, combine the cauliflower, carrot, celery, water and bouillon. Bring to a boil. Reduce heat; cover and simmer for 12-15 minutes or until vegetables are tender (do not drain).

2. In another large saucepan, melt butter. Stir in the flour, salt and pepper until smooth. Gradually add milk. Bring to a boil over medium heat; cook and stir for 2 minutes or until thickened. Reduce heat. Stir in the cheese until melted. Add hot pepper sauce if desired. Stir into the cauliflower mixture.


Preparation time: 10 minute(s)


Cooking time: 20 minute(s)


Diet type:Diet tags: gluten free, low fat


Number of servings (yield): 4


Entire recipe makes 4 servings

Serving size is 1 1/2 cups

Each serving = 4 SP

PER SERVING: 123 calories; 3g fat; 1.5g saturated fat; 18g carbohydrates; 10g sugar; 9g protein; 4g fiber


thumbnail

Carnation Café Closes Thursday for Renovations at Disneyland Park

A Disneyland park favorite will close its doors this week – but only until summer, when Carnation Café will re-open with more seating (adding the indoor seating that disappeared in the 1990s) and a spruced-up menu.


And no worries – if you’re looking for cast member favorite Oscar Martinez, you’ll find him over at the Jolly Holiday Bakery Café opening this month, but only until Carnation Café re-opens. Then you’ll find Oscar back at Carnation Café.


When Carnation Café re-opens, look for breakfast, lunch and dinner favorites, along with new dishes and some Walt Disney favorites.


So, ‘til the doors open this summer, here’s the recipe for the decadent Loaded Baked Potato Soup just in case you have a hankering.


Loaded Baked Potato Soup from Carnation Café at Disneyland Park

Loaded Baked Potato Soup


Serves 6


1 pound bacon, roughly chopped

1 medium yellow onion, diced

1 large carrot, peeled and diced

3/4 cup diced celery

4 large Russet potatoes, peeled and diced

4 medium red potatoes, diced

1/4 cup flour

2 cups chicken or vegetable stock

Coarse salt, freshly ground pepper, to taste

4 cups heavy whipping cream

Optional garnishes: chopped chives, bacon bits, sour cream, shredded cheddar and Monterey Jack cheese


  1. In a 6- to 8-quart stockpot over medium heat, fry bacon until crisp.
  2. Remove bacon and drain on paper towels, reserving half for garnish. In bacon fat, cook onions, carrots, and celery until the onions are translucent. Add potatoes and cook for 4 minutes, stirring occasionally.
  3. Whisk in flour and stir constantly over low heat until the flour is cooked and the mixture has thickened slightly, about 5 to 7 minutes. Add chicken stock and half of the bacon. Season with salt and pepper.
  4. Over medium-high heat, bring the soup to a simmer and cook for 25 minutes or until the potatoes are soft. Mash some of the potatoes for thicker, creamier texture. Add whipping cream and simmer for 5 minutes.
  5. Adjust thickness by adding water or stock. Soup should have a creamy consistency.
  6. Season to taste, and garnish with toppings.

Cooks’ notes: Soak diced potatoes in cold water until ready to use to keep them from turning brown. To make bacon easier to chop, lightly freeze.


среда, 17 февраля 2021 г.

thumbnail

Caramelized Onion Roasted Garlic Bisque

This Caramelized Onion Roasted Garlic Bisque (aka soup) is one of our favorite soups around my house. It’s warm and comforting, especially on those cold winter nights.


Looking for other great comfort food? Try my Vegetarian Pot Pie. You’ll love it!


We appreciate your support


This post may contain affiliate links. Life Currents participates in different affiliate programs. As an Amazon Associate I earn from qualifying purchases. For more information see here.


Please let me know if you have any questions about this recipe. I read all the comments myself and I try to help as soon as I can. I have readers from all levels of comfort and experience in the kitchen on my site, and I’ve tried to answer some of your questions already in the post. But if I’ve missed anything, please fell free to leave a comment and ask.


Rich and creamy soup


It’s fairly light on calories for the flavor punch that it packs. It’s full flavored, just delicious with all those onions and roasted garlic and leeks.


Bisque means soup


Now, don’t let the word “bisque” scare you off; it’s just a fancy word for thick creamy soup made of puréed vegetables.


Caramelize those veggies


When you caramelize veggies it brings out so many flavors. Nutty, roasted, complex flavors.


Caramelized Onion Roasted Garlic Bisque takes a little time to make, but not much active working time. Mostly just caramelizing the onions and roasting the garlic.


Then there’s a little blender work. And don’t forget, the darker you cook the onions, the darker the soup will be, so don’t skimp on the caramelizing step.


How to use leftovers?


I’ve used the leftovers as a sauce for pasta, adding in some toasted pine nuts and corn.


I’ve used the sauce as gravy over mashed potatoes or chicken (for the husband).


And, I’ve always been pleased with how delicious and versatile it is.


Milk of choice


Feel free to use whatever milk you prefer, from whole dairy milk to lower fat dairy to plant-based milks.


For the soup in the pictures here I used whole milk, but will often use 1% milk.


The color of the soup will be darker if you use a lighter-fat milk.


I think refrigerated carton almond or cashew milk would be a good plant-based milk to use in this for its neutral flavor.


Pinterest


This Caramelized Onion Roasted Garlic Bisque pin has been pinned more than 121,000 times!


Wow that’s a lot!


Hop over and pin it too! While you’re there check out all the people who have tried it and loved it!


Do you like garlic?


Here are some other recipes you will love!


Let’s Connect


If you like seeing my recipes subscribe via email in the upper right, or with push notifications using the red bell.

Or, connect with me on your favorite social media channel for recipes, photos, and much, much more:

Pinterest, Facebook, Instagram, and Twitter!

And find my shop on Amazon for recommendations on cool tools


If you try this recipe, please come back and leave a comment below letting us know how it goes.

Share a picture and tag @lifecurrents on Instagram.

Or you can upload a “tired it” photo (I would love to see)

via the pin.


Kitchen tools you may need for this recipe


Caramelized Onion Roasted Garlic Soup Recipe


thumbnail

California Grilled Chicken

♫ California looove ...♫


  1. In a small bowl, whisk together balsamic vinegar, garlic powder, honey, oil, and Italian seasoning and season with salt and pepper. Pour over chicken and marinate 20 minutes.
  2. When ready to grill, heat grill to medium-high. Oil grates and grill chicken until charred and cooked through, 8 minutes per side.
  3. Top chicken with mozzarella, avocado, and tomato and cover grill to melt, 2 minutes.
  4. Garnish with basil and drizzle with balsamic glaze.

Font, Text, Photography, Photo caption,

This content is created and maintained by a third party, and imported onto this page to help users provide their email addresses. You may be able to find more information about this and similar content at piano.io


thumbnail

Cajun Chicken Pasta


Cαjun Chicken Pαstα


Yield: 4 Servings Prep Time: 10 Minutes Cook Time: 20 Minutes Totαl Time: 30 Minutes


Chili’s copycαt recipe mαde αt home with αn αmαzingly creαmy melt-in-your-mouth αlfredo sαuce. Αnd you know it tαstes 10000x better!


INGREDIENTS:


  • 2 boneless, skinless chicken breαsts
  • 2 tαblespoons olive oil, divided
  • 1 tαblespoon cαjun seαsoning
  • 8 ounces penne pαstα
  • 2 tαblespoons unsαlted butter
  • 3 cloves gαrlic, minced
  • 1 cup heαvy creαm, or more, to tαste
  • 1/2 teαspoon lemon zest
  • 1/4 cup freshly grαted Pαrmesαn
  • Kosher sαlt αnd freshly ground blαck pepper, to tαste
  • 2 Romα tomαtoes, diced
  • 2 tαblespoons chopped fresh pαrsley leαves

DIRECTIONS:


  • In α gαllon size Ziploc bαg, αdd chicken, 1 tαblespoon olive oil αnd cαjun seαsoning, shαking to coαt thoroughly.
  • Heαt remαining 1 tαblespoon olive oil in α grill pαn over medium high heαt. Αdd chicken αnd cook, flipping once, until cooked through, αbout 5-6 minutes on eαch side. Set αside αnd keep wαrm.
  • In α lαrge pot of boiling sαlted wαter, cook pαstα αccording to pαckαge instructions; drαin well.
  • Melt butter in α sαucepαn over medium heαt. Αdd gαrlic, αnd cook, stirring frequently, until frαgrαnt, αbout 1-2 minutes.
  • Grαduαlly whisk in heαvy creαm αnd lemon zest. Cook, whisking constαntly, until incorporαted, αbout 1-2 minutes. Stir in Pαrmesαn until slightly thickened, αbout 1-2 minutes. If the mixture is too thick, αdd more heαvy creαm αs needed; seαson with sαlt αnd pepper, to tαste.
  • Stir in pαstα αnd gently toss to combine.
  • Serve immediαtely with chicken, gαrnished with tomαtoes αnd pαrsley, if desired.

Related Post


  1. One Pot Cαjun Chicken αnd Sαusαge Αlfredo Pαstα Prep Time 5 mins Cook Time 15…


0 out of 5 ☆ ☆ ☆ ☆ ☆


понедельник, 15 февраля 2021 г.

thumbnail

Buffalo Wild Wing Night at Home

My family LOVES Buffalo Wild Wings. One thing I DON'T love is spending $75 on one meal (yes, that price includes a couple of beers each for the hubby and I. Who can have wings without beer?). So...we just don't get to go out to eat as often as we would like. I guess that is one of the drawbacks of being a stay-at-home-mom. When we originally cut back on our dining out, I won't lie, it was hard and I really missed it. Now, I have started to have fun with it. Funnily enough, many of our restraunt favorites are actually very easy to make at home.


For both of the sauce recipes below, we used popcorn chicken. The ones I used were the Member's Mark brand from Sam's Club, which are very good and almost exactly like the boneless wing pieces at BWW. We do deep fry our chicken just like BWW's does, but I do think you could get away with baking it if you wanted to save some calories. We don't have these very often, so we go all out when we do;P


Sweet and Spicy Wing Sauce is a tried and true recipe we have been making for awhile now. It is a bit spicy, but it is mild enough that all 3 of my kids will eat it. It also has a sweetness to it from the honey that is irresistable. This sauce is not actually a BWW copycat recipe, but it is at least as good as many of their best sauces.


Combine the butter, hot sauce, ketchup, and honey in a small saucepan. Bring to a boil over medium-high heat. Reduce heat to low and simmer for 15 minutes.


The next sauce recipe I would like to share is for Spicy Garlic Sauce. Let me just say, it is AWESOME. It really is just like the real thing that they serve at Buffalo Wild Wings.


Combine all ingredients except egg yolk, water, and cornstarch in a small saucepan. Heat sauce over medium heat until boiling, then reduce heat and simmer for 5 minutes. Remove pan from heat and allow it to cool, uncovered, for 10 minutes.


While sauce cools, vigorously whisk egg yolk with 2 tsp. water in a medium bowl for about 2 minutes or until the color is a pale yellow. Whisk in cornstarch until disolved. Drizzle sauce mixture into egg yolk mixture in a steady stream while rapidly whisking. Now you should have a nice, thick creamy sauce! If you aren't ready to make yours wings, just pop in the fridge and store until needed!


Now I just need to learn how to make Mango Habanero Wings! Yum! Those are my new favorite thing to have at Buffalo Wild Wings. When I made the above recipes, I also made Buffalo Chips. I will have to share the recipe for those soon!


thumbnail

Buffalo Keto Chicken Tenders

0 out of 5 ☆ ☆ ☆ ☆ ☆


BUFFΑLO KETO CHICKEN TENDERS


COURSE: MΑIN DISH


CUISINE: ΑMERICΑN


KEYWORD: KETO CHICKEN TENDERS


PREP TIME: 10 MINUTES


COOK TIME: 30 MINUTES


TOTΑL TIME: 40 MINUTES


SERVINGS: 6 TENDERS


CΑLORIES: 285 KCΑL


INGREDIENTS


  1. 1 lb Chicken Breαst Tenders
  2. 1 cup Αlmond Flour
  3. 1 lαrge Egg
  4. 1 tbsp Heαvy Whipping Creαm
  5. 6 oz Buffαlo Sαuce(pre-mαde)
  6. sαlt/pepper

INSTRUCTIONS


  1. Preheαt oven to 350 degrees.
  2. Seαson chicken tenders with sαlt αnd pepper. Seαson the αlmond flour generously with sαlt αnd pepper.
  3. Beαt 1 egg together with 1 tbsp of heαvy creαm.
  4. Dip eαch tender first in the egg wαsh αnd then into the seαsoned αlmond flour. We like to plαce the tenders in α Tupperwαre contαiner with the αlmond flour αnd shαke to coαt. Α Ziploc bαg αlso works well.
  5. Plαce tenders on α lightly greαsed bαking sheet. Bαke for 30 minutes. If they αre not αs crispy αs you would like you cαn αdditionαlly broil them for 2-3 minutes.
  6. Αllow tenders to cool for 5 minutes αnd then plαce them in α tupperwαre contαiner, αdd the buffαlo sαuce αnd shαke to coαt. Gently shαking is best to prevent the bαtter from fαlling off.

Source Recipe : www.ketoconnect.net


пятница, 12 февраля 2021 г.

thumbnail

Buffalo Chicken-Stuffed Peppers

Spice up your stuffed pepper game!


  1. Preheat oven to 400°. Place bell peppers cut side up on a large baking sheet and drizzle all over with olive oil, then season with salt and pepper.
  2. In a large skillet over medium heat, melt butter. Add onion and cook until tender, about 5 minutes. Add garlic and cook until fragrant, 1 minute more.
  3. Add shredded chicken and hot sauce and toss until combined. Cook until the mixture comes to a simmer, then remove from heat.
  4. Divide chicken mixture between pepper halves. Top with Gouda and bake until cheese is melted and peppers are crisp-tender, 20 to 25 minutes.
  5. Drizzle each stuffed pepper with ranch dressing and sprinkle with chives.

This content is created and maintained by a third party, and imported onto this page to help users provide their email addresses. You may be able to find more information about this and similar content at piano.io


четверг, 11 февраля 2021 г.

thumbnail

Buffalo Chicken Tenders

These amazing Buffalo Chicken Tenders are full of flavor and easy to make. I started with flour, then egg wash, and bread crumbs. Once I baked them I brushed them with buffalo sauce and then dipped them in ranch.


Buffalo Chicken Tenders

I love food with some spicy. If it’s buffalo flavor then I will be eating it. These Buffalo Chicken Tenders are so simple to make and taste amazing. I serve these for the family but half get buffalo sauce and the rest get BBQ sauce since the kids and husband can’t do the spice.


I usually buy a sauce and use it when I make a small batch like this but I also gave directions on how to make homemade sauce. Just add more or less hot sauce to taste.


How to make Buffalo Chicken Tenders:


Step one: Start by preheating your oven and then prepare your baking sheet with nonstick cooking spray or parchment paper.


Step two: Once everything is prepared you will want to place your chicken tenders and your flour into a bowl and mix until well coated.


Buffalo Chicken Recipes:


thumbnail

Buffalo Chicken Soup

If you like buffalo chicken you will have to try this Buffalo Chicken Soup. It’s my new favorite soup, mixed with the bold buffalo spice and creamy ranch dressing.


Buffalo Chicken Soup

I love all things buffalo chicken. I am a big spicy food person so anything with this bold flavor is right up my ally. This soup doesn’t have too much spice though, I tamed it down so others can enjoy it but if you like more spice as I do then cut back on the ranch and add a little more buffalo wing soup or even just hot sauce. I served mine topped with more sour cream, fresh cilantro, and a little more cheese plus a few tortilla chips in the side for dipping.


How to make Buffalo Chicken Soup:


One: In a large pot melt butter on medium heat. Add onions, celery, carrots, corn, and garlic. Cook until veggies have softened.


Two: Sprinkle in flour and stir. Next add tomato paste, and chicken broth and stir well. Add in whole chicken breast and then season with salt and pepper. You can add in more salt or pepper to taste.


Three: Add wing sauce, sour cream, and ranch dressing. Bring to a boil then cover and reduce heat. Simmering until chicken is cooked through. Once cooked you can remove your chicken from pot and shred then add shredded back into the soup.


Serving options:


I topped mine with more sour cream and sour cream. I even love it with some tortilla chips on top!


Love buffalo chicken as much as I do? Check out these recipes next:


Shredded Buffalo Chicken Sandwich: Oh my goodness Y’all, this recipe is the BEST! It’s made int he slow cooker and so easy to make and taste amazing.


Baked Crispy Buffalo Wings: I love wings and this recipe is one of the best. I was able to bake them but still get them to turn our crispy, you are going to love them.


Buffalo Chicken Dip: This recipe I have been making for years. It’s been a favorite of mine for as long as I can remember. Any party or football game this will be on my table!


thumbnail

Buffalo Chicken Mac ‘n Cheese

Spice up dinnertime with this simple, scrumptious buffalo chicken mac ‘n cheese with veggies, whole grain pasta and a zesty kick!


Buffalo Chicken Mac ‘n Cheese – Easy, cheesy mac loaded with veggies and big buffalo flavor. Spicy and scrumptious! | thecomfortofcooking.com

Three days a week, I’ve been bounding out of bed and onto a treadmill, if for no other reason than because I love good food. And let’s be real… it’s about time to face the music and cut out some of my delicious vices. But! There’s no reason a good granola eating girl can’t indulge once in a while, and oh did I. With a few green things thrown in, of course.


Buffalo Chicken Mac ‘n Cheese – Easy, cheesy mac loaded with veggies and big buffalo flavor. Spicy and scrumptious! | thecomfortofcooking.com

With all these fabulous flavors in one dish, my inner fat girl rejoiced! Though my sensible skinny girl had a little self control and stopped at one serving.


Buffalo Chicken Mac ‘n Cheese – Easy, cheesy mac loaded with veggies and big buffalo flavor. Spicy and scrumptious! | thecomfortofcooking.com

A creamy mixture of blue cheese, buffalo sauce, garlic and cream cheese coated a bed of penne, vegetables, chicken and cheese, which was dusted with breadcrumbs and popped into the oven for just over half an hour. Hello, heaven? It’s Buffalo Chicken Mac ‘n Cheese calling.


Buffalo Chicken Mac ‘n Cheese – Easy, cheesy mac loaded with veggies and big buffalo flavor. Spicy and scrumptious! | thecomfortofcooking.com

Try this as a tasty weeknight meal that’s easy and fast, or as a delicious dish to devour with fellow football lovers! It may be a little sinful, but it’s totally heavenly for when you’re craving something bad that’s OH SO good!


Ingredients


  • 13 oz. box whole grain pasta penne, shells or rotini
  • 1 lb. cooked chicken cut into bite-sized pieces
  • 2 small bell peppers red and yellow, seeded and chopped
  • 1 bunch chopped green onions divided
  • 1 cup blue cheese dressing recommended: Wishbone
  • 1/2 - 3/4 cup buffalo sauce recommended: Frank’s Red Hot
  • 3 cups shredded cheese divided (cheddar, mozzarella or a blend)

Instructions


  • Preheat the oven to 350 degrees F.
  • Boil pasta in salted water according to package instructions. Drain and transfer to a 13 X 9 inch baking dish. Toss in cooked chicken, bell peppers, half of the green onions, and half of the shredded cheese. Mix well.
  • Place the garlic, cream cheese, blue cheese dressing and 1/2 cup buffalo sauce in a food processor. Puree until smooth, taste and add another 1/4 cup buffalo sauce if needed. Pour over the pasta and toss.
  • Mix the remaining 3/4 cup cheese and the panko together. Sprinkle over the top of the pasta.
  • Bake until golden, approximately 30-40 minutes. Sprinkle with remaining green onions.

среда, 10 февраля 2021 г.

thumbnail

Buffalo Chicken Grilled Blue Cheese

Wow, this is an awesome way to spice up your classic grilled cheese! MacKenzie from Grilled Cheese Social says it’s really rich and gooey; perfectly satisfying those cravings for something spicy and indulgent. She used one of her mom’s famous dip recipes for the cheese mixture, and combined it with finely chopped chicken and hot sauce. Go on over and pay her a visit for the ultra-yummy recipe and instructions.


Buffalo Chicken Grilled Blue Cheese | Recipe By Photo

вторник, 9 февраля 2021 г.

thumbnail

Buffalo Chicken Dip

Ingredients


  • 1 pound of boneless skinless chicken breast
  • 1 Bottle of Franks Red Hot sauce (12 oz. or 1.5 cups)
  • 8 oz container of cream cheese
  • 1 cup Mexican cheese blend (or your favorite blue cheese or gorgonzola)
  • 1 cup Ranch dressing.
  • 1 bag tortilla chips and/or veggies for dipping

  1. Poach about 1 pound of boneless skinless chicken breast in chicken stock and water.
  2. Using 2 forks, gently thread chicken into small chunks. You can also shred your chicken in your (Kitchenaide) stand mixer using the flat, paddle beater.
  3. In a bowl, combine shredded chicken with Franks Red Hot sauce, to taste. My family likes it spicy, so I use lots!
  4. Let the chicken soak in the hot sauce until ready to use.
  5. Spread one 8 oz container of cream cheese into the bottom of an un-greased baking pan or casserole dish.
  6. Top with buffalo chicken...
  7. Sprinkle on some cheese. I like a mexican cheese blend, but you can also use blue cheese or gorgonzola.
  8. Finish it off by drizzling on some Ranch dressing.
  9. Bake at 350 degrees for 20-25 minutes, until dip is melted and bubbling.
  10. Serve with chips and veggies for dipping!

And how it looks...


thumbnail

Buffalo Chicken Crunchwrap

We love crunchwrap supremes and we love buffalo chicken wings so naturally we combined them! This is our favorite take on buffalo chicken and have a strong feeling you are going to love it too.


  1. In a medium bowl, combine shredded chicken, hot sauce, and melted butter. Add chives and season with salt and pepper.
  2. Onto each flour tortilla, add about a quarter each of the chicken mixture, celery, cheddar, romaine and blue cheese.
  3. Tightly fold the edges of the large tortilla towards the center, creating pleats. After wrapping, quickly invert crunchwraps so the pleats are on the bottom and they stay together.
  4. In a large skillet over medium heat, heat vegetable oil. Working one at a time, add crunchwrap, pleated side down. Cook until bottom is golden, about 3 minutes, then flip and cook on other side until golden, about 3 minutes more. Repeat with remaining crunchwraps.
  5. Cut crunchwraps in half and serve warm with ranch for dipping.

This content is imported from {embed-name}. You may be able to find the same content in another format, or you may be able to find more information, at their web site.


This content is created and maintained by a third party, and imported onto this page to help users provide their email addresses. You may be able to find more information about this and similar content at piano.io


понедельник, 8 февраля 2021 г.

thumbnail

Buffalo Chicken Alfredo


Cheesy chicken alfredo + buffalo sauce = why haven't we thought of this before?


  1. Meanwhile, in a large baking dish, add chicken breasts, ¼ cup buffalo sauce, salt, pepper, and ½ packet ranch seasoning. Toss until chicken is thoroughly coated. Marinate 30 minutes.
  2. In a large skillet over medium heat, heat olive oil, then add chicken. Cook 8 minutes per side, or until no longer pink. Remove from skillet and let cool, then chop into bite-size pieces.
  3. To same skillet, add butter and cook garlic. Add remaining ¼ cup buffalo sauce and cream cheese and whisk until combined. Slowly whisk in milk and remaining ranch seasoning; continue whisking until combined. Add noodles, mozzarella and chicken to skillet.
  4. Serve topped with chives.

This content is created and maintained by a third party, and imported onto this page to help users provide their email addresses. You may be able to find more information about this and similar content at piano.io


thumbnail

Buffalo Cauliflower Bites

Buffalo chicken wings who*? This vegetarian version of everyone's favorite football snack will satisfy everyone and taste just as amazing with ranch (or blue cheese).


*Jkjk: We will forever love chicken wings.


  1. Preheat oven to 450°. Toss cauliflower with cornstarch and oil and season with salt and pepper. Spread into an even layer and roast until golden, about 20 minutes.
  2. Meanwhile, in a small bowl, combine hot sauce, butter, and garlic powder together.
  3. Pour hot sauce mixture over cauliflower and toss to coat.
  4. Serve warm with blue cheese and ranch dressing for dipping and celery sticks.

This content is created and maintained by a third party, and imported onto this page to help users provide their email addresses. You may be able to find more information about this and similar content at piano.io


About

Поиск по этому блогу

Технологии Blogger.